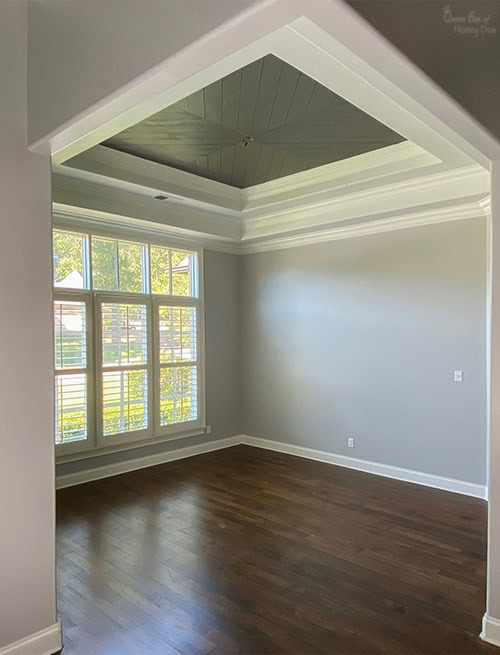
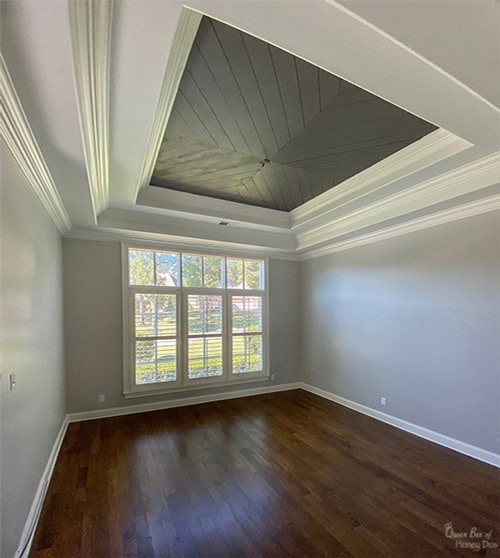
Welcome back for round three of this year’s One Room Challenge. If you missed the previous weeks, let me quickly catch you up by saying that I am doing a renovation of my dining room and turning it into a dining/home office. This week’s project is to install a chevron plank ceiling. But not just any planked ceiling. This one is going inside my already beautiful tray ceiling.
How To Chevron Plank Ceiling!
If you are unfamiliar with the One Room Challenge, it is a biannual event that brings together a selection of designers and renovators to create and share a variety of room makeovers and to showcase our (the designers’ and renovators’) talents. It is a media partner for Better Homes and Gardens, so sort of a big deal for those of us involved.
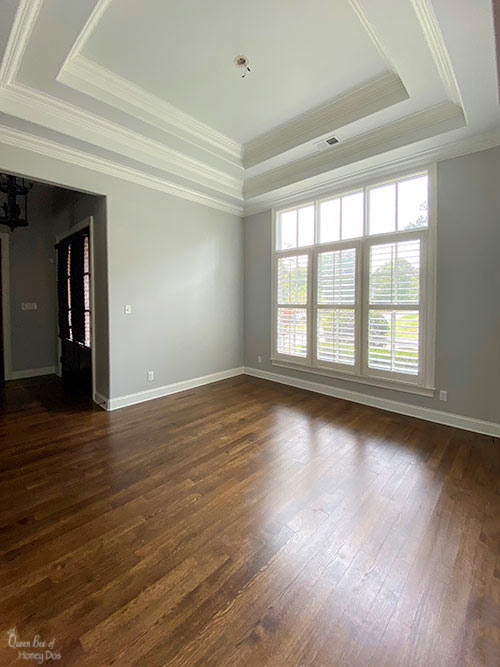
Just to recap, when we left off last week, I had just finished the fresh paint job. Did you miss it? If so, take a gander at the image above.
Gorgeous Repose Gray from Sherwin Williams on the walls is combined with West Highland White on the trim. Ceilings are done in Spare White, but most of that is about to change!
(This post may contain affiliate links (*). That means that I make a small commission from sales that result through these links, at no additional cost to you. You can read my full disclosure here.)
Cheapest Way to Install a Chevron Plank Ceiling
Is price a concern for you? I like to do all of my projects in a way that is correct but also affordable for both me and everyone else. But, we also want quality craftsmanship, right?
Fortunately, doing things yourself will cut back on the expense quite a bit. But, I wanted to make sure that I still got the most cost-effective way to plank a ceiling.
After checking out the various shiplap and tongue-and-groove planks that are available on the market, I decided on ripping my own planks. There are a few reasons for my decision.
One, it is a much cheaper alternative, and two, ripped plywood leaves a lot of options for customization that you can’t get from some of the ready-to-install planks. (like staining, should you like that option)
Why Plywood Planks are Cheaper than Ready-to-Install

I priced out a few options in the ready-to-install department. Let’s begin with the primed shiplap that is available for purchase through the big box stores. These run around $8 per plank. The cheapest that I could find was $5.68 for an 8’ x 5.25” plank. So, we’ll use that price point for comparison.
Tongue-and-groove planks run a bit more. If choosing a high-quality version, these can be significantly more expensive than the either primed shiplap or plywood. But for simplicity, I will still use the cheaper $5.68 price.
Now, a 4’x8’ sheet of birch plywood that is 1/2” thick (equivalent to the shiplap thickness) will run about $22 per sheet. This will give you 9 planks of the same dimensions as the shiplap with a tad leftover.
That means that for the same amount of coverage from the ready-to-install shiplap, you will spend just over $51. That’s almost double the cost in lumber.
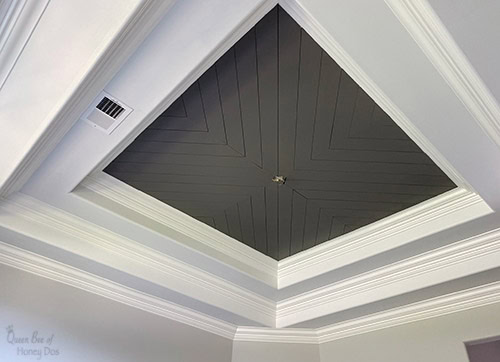
What’s more, you can cut that price down even more if you go with a 1/4” sheet of plywood. Which is what I have done for my planked ceiling. (as seen above with a few cuts from my scrap wood box thrown in)
The price for a sheet of 1/4” birch plywood runs about $14 per sheet. That comes out to about $1.56 for each plank once the sheet is ripped down.
Even if you decide to go with the something more expensive, like pure bond plywood which runs $27 per sheet, it would still average out to around $3 per plank.
And the great thing is, no-one can tell how thick the planks are once they are all installed. So, why even bother with the expensive stuff?
Why Plywood is More Versatile
First, I will have to admit that having a primed plank is great if you are planning to paint them. But, for the money you will save, you can afford the primer and paint and still have some savings.
For example, a 12’ x 12’ ceiling will require around 40 planks (maybe a few extras for good measure). That will run around $230 in pre-primed planks. The same amount taken from a 1/4” plywood sheet will require 5 sheets with plenty leftover for extra. Those five sheets will cost approximately $70.
That leaves plenty for paint or stain to finish off the ceiling. But, wait there are more benefits from using the 1/4” plywood. Most of the time, you can get away without having to remove your crown molding.
Now, this will depend on the style of crown molding being used and your skill at miter cutting, but most crown has a 1/4” reveal where the crown meets the ceiling. If you can make accurate cuts, you can slide the planks right against the crown molding and no-one will ever know.
Of course, if you have problems with getting precise cuts, you can always remove the crown molding and reinstall it over the planks to cover up the imperfections. That’s just one option that you won’t have with the thicker material. (They will require the crown molding to be removed before installation of the planks).
You also have the options of doing a lot of different finishes to the plywood. You can still paint it if you want, or you can use a stain. You can even do a multi-dimensional wood finish.
I love driftwood finishes and weathered gray finishes. But for this project, I am using Sherwin William’s Gauntlet Gray.
Whichever material you choose to go with is a personal decision and should be based on what you hope to achieve, how much work you want to do, and how much you are willing to spend. You may find that you prefer one of the other materials.
How to Install Ceiling Planks in a Chevron Pattern
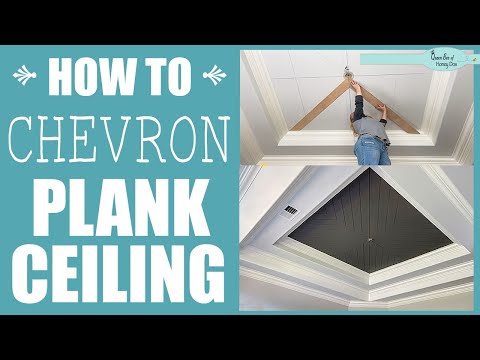
Nothing beats watching the process. It goes a long way towards clarifying some of the intricate details listed below in the instructions.
You can view the video above, but I recommend checking out the written details below.
Take Measurements for Chevron Plank Ceiling
(Please note, that if you are removing your crown molding for this project, you will need to do so before you take any measurements.
I am working around mine, but this requires dead-on precision with the cuts and may be too difficult for some.
Removing the molding and then reinstalling it over the plank edges can hide imperfections. Just something to consider).
The very first thing that I did in this process was to take measurements and make precise markings. If you are duplicating this chevron plank ceiling effect, you will need to know where the center of each wall is located.
Measure once. Then, measure again. If they don’t come out the same both times, measure a third or even a fourth time. Place a clearly identifiable mark at the center points along each side of the ceiling.
For the corners, no measurements are needed. Since you want the planks to align visually with the corner angles as they are, just use the very center of the corners as your points.
Layout the Chevron Pattern
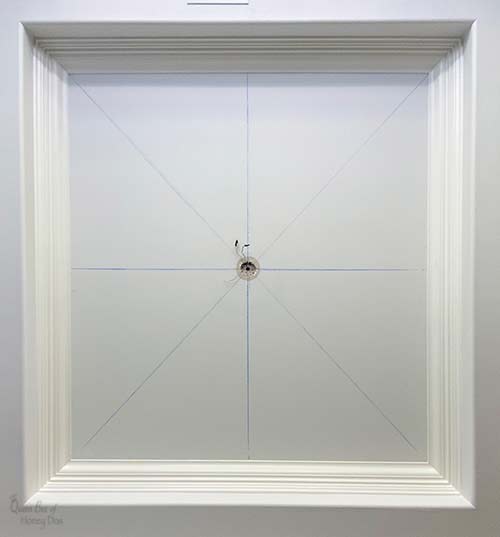
Next, I used a chalk line to mark my pattern layout. In order to be able to snap my chalk line all the way across each point-to-point, I placed a tack on the center point on one side, wrapped my string around the tack, and then held it in place at the opposite point.
Stretch the chalk line nice and tight. Then, reach towards the middle of the string and pull it away from the ceiling and let it snap back. Repeat this a second time to make sure that your line is accurate.
If you are getting completely different snapped lines, that means that you are pulling the string to the side. It is important to pull straight down from the ceiling in order to get accurate lines.
After the pattern lines were laid out, I then located and marked where the ceiling joists were located. This way, I can strive for a few of my nails to go through a stud.
Determine the Angles for the Pattern
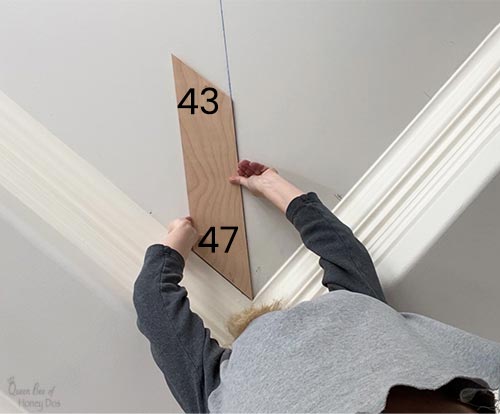
Once the lines have been established, it is time to figure out the angles for the cuts. With this pattern, there will be 16 different angles. If you are lucky, the angles will be the same for each mirrored section and the reverse for the remaining two sections.
To determine the angles for each section of the chevron pattern, I made a template from a few small pieces of a plank. Because the angle can vary from corner to corner, I cut templates for 42, 43, 45, 46, and 47 degrees.
These were my starting points. Make in-between templates if needed, and if your miter saw doesn’t go past 45 degrees, check out my post on making any angle cut. It will get you where you need to be.
Next, I laid the templates along the chalk lines at each corner. I just kept trying out different templates until I found the exact angle that fit flush against the crown molding and the chalk line.
I repeated the process for each chalk line at all corners and center points, making notes of which angle was needed.
Be sure to take measurements for all 16 angles even if you think that you know what they will be. Don’t guess. You might want to assume that the mirrored side of each section will be identical, but they may not necessarily be.
On my ceiling, the left and the right sides were exact mirrors, but one-half of the other two sections were a bit off. I ended up with three out of four corner sections being 43 degrees and the fourth coming in at 43 1/2. So, don’t expect everything to add up to a perfect 180 degrees on each triangle.
Perfect Plywood Cuts
One thing that is of concern to most people wanting to make there own planks is how to get perfect cuts. The planks need to be straight, accurate and damage-free. But it is not that hard to get perfect planks.
Ripping the plywood into planks
There are several ways that you can get the plywood ripped down. The easiest would be to let the guy at the store do it for you. But, some of the Home Depot stores won’t do it because they have a 12” width rule. However, I have found that this rule is not always enforced. So it wouldn’t hurt to ask.
The next method is to rip them yourself. I used my table saw. This is okay as long as the sections being ripped are not too unwieldy. Since 1/4” plywood is lightweight, I can rip it with ease by using my three-way convertible tables to support the on and the off feed.
However, if a table saw is not an option for you, or if you are using thicker plywood, I recommend ripping them down with a circular saw and a guide. You can get good cuts on full sheets by using the foam board method.
To do this, you place a sheet of foam board insulation on the ground or onto any large flat surface. Then, place the plywood on top of the foam board. Adjust your saw blade so that it cuts all the way through the plywood but not all the way through the foam.
Use a guide to make perfectly straight cuts and to keep all of the planks the same width. A good inexpensive guide for this project is the Kreg Rip-Cut Circular Guide.* I use mine every time I need to make rip cuts into heavier plywood sheets.
Making the Miter Cuts
Because I wanted to get my angles cut as precise as possible, I first made sure that my miter saw’s alignment was accurate. A bad alignment will never give accurate results. If you need a tutorial on how to get your miter saw aligned, you can use mine.
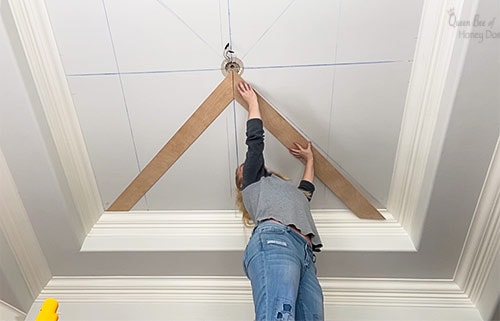
Next, I made the miter cut for the angle that would rest along the outer edge of the ceiling. I did not make the inner cuts until after I test fit the first angle and marked the exact location for the inner angle using my steel ruler.
Unless you have someone who can make each cut for you as you need them, doing it this way will require you to climb down and go make a cut twice for each plank. It definitely takes more time than installing a straight plank pattern, but I think it is worth the extra effort.
Reduce Tear-Out and Eliminate the Need to Sand
I have seen a lot of DIYers using plywood for their shiplap walls and notice that they often have to sand the edges of each plank. I did not have this issue which saved a lot of time and extra work.
You can avoid the hassle of needing to sand your edges too by using the appropriate blades. For both the rip cuts and the miter cuts, I use a high tooth count blade.
To be exact, my table saw has a Freud 60T Crosscut blade* and my miter saw has a Freud Thin Kerf blade.* Both of these will give nice clean cuts with little to no tear-outs.
Attaching the Planks to the Ceiling
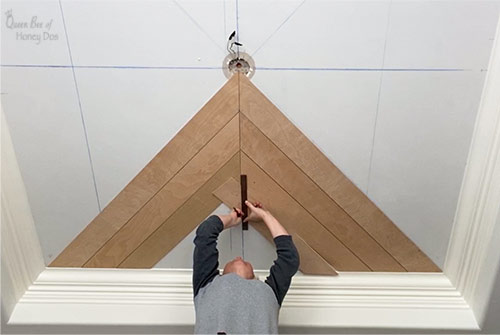
Spacing – You can also play around with the spacing just a bit. Most planks have about a nickel’s worth of spacing between each plank. You can adjust that by a tiny bit to bring your joints together snuggly.
As I said before, I test fit and marked each plank before cutting that inner angle. As you can imagine, trying to hold a plank upside down, get it spaced accurately, and draw a straight line is quite difficult. The planks always seem to slip just as I was about to draw my cut line.
With wall shiplap I would just use a few nickels to keep the planks evenly distributed. But obviously, nickels will not stay in place when doing ceiling planks. So, what I found to be the easiest way to measure, mark, and still end up with a decent space was this.
I cut the outer angle as already mentioned. Then when I did the test fit, I would lay the plank up against the previous plank nice and snug instead of trying to space it out. It is a lot easier to mark the cut line this way.
Then, when I made the cut with the miter saw for that inner angle, I would just cut inside the line instead of outside. That way, the miter saw would take away slightly more material than I measured for.
This meant that the plank would slide forward slightly on the ceiling in order to get a tight position. That slight adjustment left the perfect amount of spacing. I can’t say that each plank is identically spaced, but it is so close that you can’t tell.
Adhesive – I applied a bead of Loktite Power Grab adhesive* to the planks before attaching them to the ceiling. I advise NOT skipping this step. The adhesive will help hold the planks so that you can make adjustments prior to nailing them in place.
The adhesive will also prevent the planks from developing that swayed effect that can and will happen when thin shiplap is installed. I used all of two tubes for my ceiling. If you have a very large ceiling, you may need a third.
Nailing – I used my brad nailer with 1 1/2” brads. I don’t think that anything heavy duty is required.
Space the nails about 18” apart and staggered on each side. Try to drive a few through the joists, especially on the longer planks.
Painting the Chevron Plank Ceiling
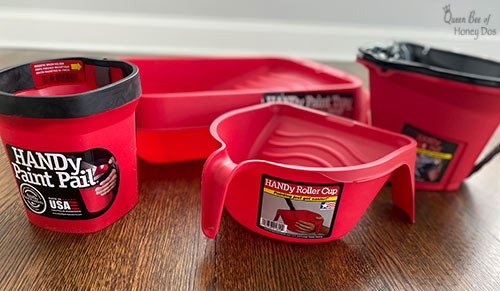
I was so thrilled to receive a package of paint trays from HANDy Paints.* I love their trays and already use them exclusively for my paint jobs – mostly because I love those magnets on the inside that hold my
But, I was really pleased to have their HANDy Pail.* I received both the standard and the professional size, but my hands are so small that the standard was perfect. It really came in handy when I painted those planks.
The straps hold the pail for you so that you don’t end up with hand cramps from gripping a handle for so long. That has happened to me so many times in the past that I couldn’t believe that I got through this round without pain. Now, if they can just come up with something to help neck and back pain due to painting ceilings.
They also have nifty paint tray covers for all of their products. They actually snap in place so there is no shifting. Yay! Big, Big plus in my book. You can find all of their products just about any place where paints are sold, or order them here.*
My Paint Color Choice
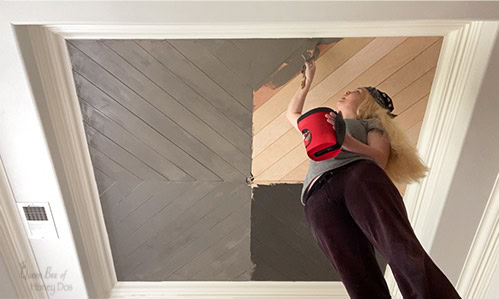
I did a quarter section in Black Fox and compared it to Gauntlet Gray before making my decision.
I felt that the Black Fox was so dark that it nearly eliminated all of the design. So, I went back to my original plan of Gauntlet Gray.
It is still very wet in the above image, but it darkens quite a bit. So, I am still getting that dark intimate color. I just didn’t want it to be so dark that everything blended together.
I decided to paint with a brush instead of using my HVLP sprayer. Hand painting will keep it from having that flat artificial look that comes from spraying. Painting in the direction of the grain keeps the results neat and maintains the texture.
I recommend that you use either a paint/primer combo or start with a good primer base. It is most important if you plan to do a light color as the tannin in the wood may show through.
If you know what color you are going to use before you get started, I would recommend painting the ceiling that color before installing the planks.
It is very tedious to go back and paint the spacing between the planks after the fact. My neck and back can attest to this.
For more tips on getting a professional paint job, you can check out my post and tips for that.
Final Comments
If you missed any of the previous phases in this room makeover or want to see what comes next, you can find the links below. Questions and comments are always welcome. Just keep scrolling. ??
Week 1 – The Plan
Week 2 – A Neutral Canvas
Week 3 – Chevron Plank Ceiling: You are here!
Week 4 – Drop Cloth Drapes
Week 5 – DIY Drum Chandelier!
Week 6 – The Big Reveal!


Shelly@ConfettiStyle says
WOW Rachel! I’m so in awe of your chevron ceiling. It’s pretty darn amazing and is going to be a showstopper in your dining/office space. Can’t wait to see the final space on reveal day.
Rachel Lynn says
Thanks Shelly! I am enjoying all the designers’ great work. Just honored to be part of such a wonderful group of women (ah hmm… and men). ?
Pamela ~ DIY VIbes says
What a statement! The ceiling turned out gorgeous!
Rachel Lynn says
Thanks, Pamela!
Christine says
Rachel,
I have just one question. I would like to use this same pattern in front of a breakfast bar. The size of the wall will be 10‘ x 4‘ can you use this pattern with a rectangle wall?
Rachel Lynn says
Yes, you can. However, keep in mind that your design will not be uniform in appearance. It will look longer (squatty) along the top and bottom and the sides will appear short. I have done it and it looks good, just different. Remember to take your angle measurements. Best!