How to Restore Pampered Chef Stoneware ( a Tale of the Recalcitrant Husband) – You know how there is that one thing that your significant other does that just really irritates you to no end? That one thing that no matter what you do or say, they seem determined to drive you mad by continuing to do it. Maybe for you, it is hair in the sink, or clothes on the floor. Well, for me it is doing the dishes properly.
A few weeks ago, I wrote in a post about how I had been down with the flu. It was a bad case that didn’t want to let up, and it took me almost two weeks to fully recover. Luckily, I have a wonderful husband who is great at handling (most) things.
For an entire week, I was so ill that just dragging myself out of bed was a feat of astronomical proportions. “Don’t worry about it”, he said. “I’ve got it all under control,” he said.
Frankly, at the time, I couldn’t care less if he destroyed the whole house, as long as I had my tissues and a dark quiet room. Of course, that wasn’t my feeling once I recovered enough to see what had happened to my beloved stoneware.
Now, I know he knows better! Seriously, my husband is an incredibly intelligent man. Plus, I have preached for years about my persnickety rules for washing dishes.
“Silverware goes right side up. Bowls go right side down. And never, ever put wood, cast iron, or stoneware in the dishwasher”.
For the life of me, I can’t figure out why he is determined to destroy my cookware! But, since he spent the whole week taking care of the kids by himself, I didn’t complain…much.

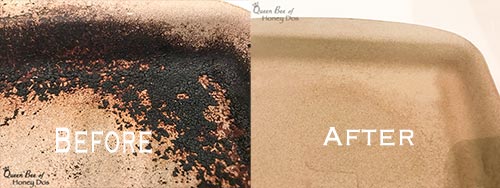
This is what my stoneware looked like. I am still at a loss as to what exactly he did to get it to look like this. All I know is I found it in the dishwasher with all of the gorgeous seasoning gone and some serious crust residue all along the edges.
There was no way to remove that crust! I thought that I might have to dispose of the thing. But first, I wanted to try my technique for restoring stoneware.
(Normal) Way To Care for Pampered Chef Stoneware
If you are new to using this product, you should know that Pampered Chef stoneware comes with a list of what to do and not do. Just to name a few…
You are supposed to properly season them before using them. You shouldn’t preheat them (which I totally ignore for my pizza stone). Never use soap to clean them.
You shouldn’t subject them to drastic changes in temperatures, and you are supposed to have most of the surface covered when cooking on them.
To clean them, the provide you with a little plastic scraper to do the heavy work. But, for the most part, these things are not meant to be washed in the traditional fashion. Just a light rinse and dry is what is recommended.
Personally, I have mostly just done whatever I felt like with mine. I’ve on occasion used soap and a scrub daddy. I cook a little, or I cook a lot, with no thought to how much surface is covered. But one thing that I have always been careful of is a change in temperature.
A Few Things About Temperature Changes
Stoneware can and will break if subjected to temperature changes too quickly. I have even noticed that there have been a lot of complaints over the past year about them breaking unexpectedly.
I don’t know if this is caused by a new, but inferior, manufacturing method, or if it is caused by mishandling. All I know is that mine has been going strong for well over 10 years.
I should also note that what I did to restore my stoneware is not recommended by the manufacturer. So, proceed at your own risk.
However, I have done this before without causing any negative results. I will say, though, that I only do this when the only alternative is disposal, or when the seasoning has gotten so thick that it begins to flake.
Re-Setting My Pampered Chef Stoneware to Like-New
So, what did I do? How did I go from a ruined stone to an almost new one? Well, I used my self-cleaning oven.
That’s right. I popped the stone in and set it to self-clean for about two hrs. After the two hours were up, all that was left was a bit of ash.
I tried and tried other methods, but nothing could take away all the baked-on and set-in crust without ending up with chemicals soaked into the stone. So, this was my last-ditch effort.
Just an FYI – this will work on all the Pampered Chef’s pizza pans, bar pan’s, and any of the traditional stoneware as long as it is the “traditional” stone. This doesn’t apply to the ceramic covered stuff or anything new that may appear in the future.
It is best for burnt stoneware and crusty layers that need to be removed, But, there are a few tricks to getting this done, as well as a few precautions that you will need to take.
1. Ventilation Is Required
Since this technique worked so well, I have done it several times on all of my stoneware. Because of the natural odors produced by the self-cleaning oven, I highly recommend good ventilation.
I now schedule my stone reset to be done during spring cleaning, if I notice that they are needing it. In fact, if I have a flaking stone, I add the task of restoring it to my spring cleaning list. I wait for a nice breezy day is nice, open all the windows, and let the airflow while the oven is running.
2. Start with A Clean Oven
I only run my stoneware through the self-cleaning cycle on a completely clean oven. I never try to clean both at the same time. It is simply too much of a smell for me to tolerate. So, if the oven needs cleaning, I do that first.
3. Allow Stoneware to Completely Cool
And when the cycle is finished, I leave it until it has completely cooled. This is probably the most important step. You don’t want to remove the stoneware while it is still hot. (Remember the change in temperature rule). Once it has cooled to the touch, then I take it out and rinse away the leftover ash.
I place the stone directly on the bottom of the oven. My oven has a hidden bottom element, so I can do that. But, if you have an exposed element, place it on the bottom rack. This will leave a bit of headroom just in case it throws a grease flame. (more on that below).
Safety Concerns Surrounding Oven Fires
As you probably already know, there is some debate about whether using the self-cleaning feature of an oven is safe due to the by-products it can produce. I won’t go into all of that today, but I do want to address the potential for grease fires.
If you have ever had a fire occur inside your oven, you know that it can be pretty scary. It usually occurs because there is a fresh spill or a greasy piece of food left in the oven. Thankfully, this is a rare occurrence with cleaning. But, it can and does occasionally happen.
As far as the stones are concerned, you should not attempt to clean a heavy coated stone, especially one with a fresh oil layer, without following the precautions listed below in number 4. (Bold text to emphasize)
How to Prevent Oven Fires
Some ovens are more prone to this condition than others. But, if your oven is in proper working order and you follow a few steps, you should not have a problem.
- Never run a self-cleaning cycle if the seal on your oven is damaged or malfunctioning.
- As mentioned before, don’t try to clean your oven and your stoneware in one round. Break it down into steps to reduce the workload on the oven and to reduce the fumes.
- Never leave your home while running the self-clean mode.
- Always remove the heavy, sticky, and large build-up particles before running the stone through the self-cleaning mode.
If you have a lot of thick build-up on your stone, you can breakdown a lot of the grease and oils by soaking the stone in hot water for several hours. Scrap away any large clumps of burned on particles.
Try running it through the dishwasher, first. Put the setting on hot and do NOT use any detergent. This is the only time that I would recommend doing so.
Although I was not happy with my husband running my stone through the dishwasher, it did have one benefit. It removed all of the fresher oil layers. What was left behind, while impossible to remove by hand, was quite agreeable with the oven’s self-cleaning function.
After using this technique on multiple pieces, I have discovered one thing for certain. If the fresh oils are broken down/removed prior to going into the oven, the cleaning mode works perfectly.
What To Do If You Do Get an Oven Fire
- First of all, don’t panic. Your oven was made to handle high temperatures. While flames are scary, they normally die down within a few minutes on their own. If your oven seal is functioning properly, the fire is contained.
- Cancel the cleaning cycle and allow the oven to cool. If your oven is one of those that doesn’t allow you to end a cleaning cycle mid-way through, be familiar with how you would wish to disconnect the power. The easiest and safest way is to simply flip the switch in your electric box. Pulling the plug should be your last resort because you can burn yourself trying to get to it.
- NEVER open the door while the flames are active. It may be your natural reaction to want to douse the fire with baking soda, but opening the door can result in severe burns and provide additional oxygen to the flames.
- After the oven has cooled, remove the stone and do a proper presoak/wash cycle as described in number 4 above. Then, restart the cleaning process.
Final Comments…
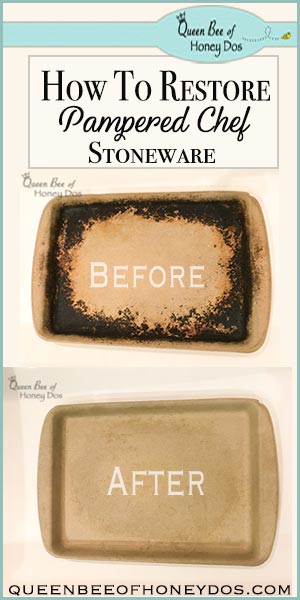
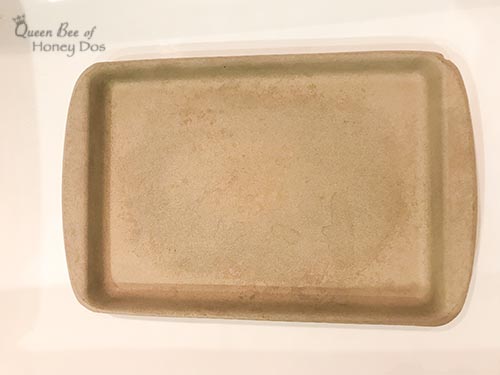
As you can see, my pan was restored to almost new condition. It just needs to be re-seasoned and it will be good to go. I will caution you, though. This isn’t a process to be taken lightly.
I can’t promise that your stone won’t break – especially since there may be issues with the newer stones. What I can tell you is that if you need to reset your Pampered Chef stoneware, this method works. However, as I said before, I would just recommend doing this when there is no other alternative.
(And sweety, if you are reading this, you know I love you.) :-)


Virginia says
Whst does your stone need reasoned mean?
Rachel Lynn says
Hi Virginia,
lol That was a typo. It was suppose to say “re-seasoned,” but my auto correct keeps changing it. I will fix it!
But for those who want to know about seasoning and re-seasoning: When you first get your stoneware, you are suppose to season it, which means that you apply a coating of oil to the interior surface and bake it at around 200 degrees for 15 minutes. The oil will adhere to the stone and create a stick-free piece of cookware. Seasoning also occurs overtime, as the oils from cooking naturally form a coating over the stoneware. The idea is to achieve a nice brown color. It is because of this coating that you should avoid dishwashers, because it will ruin them. Once you reset the stoneware, it will be similar to how it was when new. So, you will need to start all over with the seasoning.Hence “re-seasonong.” Hope that explains it. :-)
Marsha Gardner says
PC does not say to pre-season the stone in Use & Care.
Though you are correct, it happens naturally when baking anything with oils or butter…such as cookies, biscuits.
If the stone breaks while trying this method in the clean cycle of your oven….. it will not be covered under warranty.
Although, I have done it.
Rachel Lynn says
You are correct. This wouldn’t be covered by the warranty, which is why I only recommend doing it as a last resort. :-)
Deb says
I have done this for years! mine have always been fine. I have kids that can’t “remember” the rules while I am at work
Rachel Lynn says
haha! My son has taken a liking to my stones just recently. I completely understand.
Casey says
Do you have any recommendations for cleaning a stone that someone “seasoned” with some kind of oil that has left the stone sticky? Other than “seasoning” it incorrectly, I don’t think it has been used at all. Thank you for your help!
Rachel Lynn says
Casey, a sticky stone is caused by too much oil being applied more so than the type of oil. If it were me, I would start over. Scrape/wash away as much as possible. Then burn off the rest. Make sure that you don’t add water to a stone that is still hot from the oven as that can crack it. Just let it cool naturally.
Casey says
Thank you!
Terrie says
I “inherited” a pizza stone that has some serious issues. When ever I have used it it smokes up the whole house and the oil smell is a bit rancid. Is it trash or do you think this may help? It has been sitting in my cupboard for years because I hate to toss it. Maybe it is time to say goodbye. What are your thoughts?
Rachel Lynn says
Terrie, if it is smoking now, it will smoke even more so if you do an oven cleaning on it as is. But before I would throw it away, I would try running it through the dishwasher a few times with just hot water, first. I know my whole point above was that you aren’t suppose to do that, but as you can see, it does an amazing job of destroying the layers of old seasoning and oils. You will be left with an ugly mess, but the mess left behind will not produce smoke the way it is doing now. Scrape away as much loose material as you can. Then, put it in the oven on the clean setting for a few hrs as described above. Normally, I wouldn’t recommend the dishwasher, but if the only other choice is the trash, you may as well give it a go.
Walter Stamper says
Hi Rachel, good method, but I have a slightly better way to rejuvenate stoneware. If you’re interested in finding out (no, I’m not charging or selling anything) email me and I’ll demonstrate.
Rachel Lynn says
Walter, I’m always thrilled to find new and better ways to do things! Please, feel free to share the details here so that all my wonderful viewers can benefit. ?
Lisa says
Curious as to what Walter Stamper’s method was. Can you share please, Rachel Lynn?
Rachel Lynn says
Unfortunately, I was unable to find out. I encouraged him/her to respond, but no luck.
Deb says
After having guys over to repair the wiring on my oven for the second time….one of the men said “it’s that self-cleaning setting…you should never use it. We have these repairs all of the time. The ovens get to hot for the wiring….So for me…it’s cheaper to throw out a dish than take the chance on a fire…or call the repairman again.
It may not happen on every oven but it certainly did on mine….just sharing
Rachel Lynn says
Yeah. Sadly, some ovens have flaws in their design and can’t handle the heat. It would be nice if the powers that be would require them to at least meet the minimum requirements to safely do what they claim. But maybe that’s just me. 🤔
Pat Sullivan says
My wife informed me that I had ruined her stoneware pizza by over cleaning it. I had used a little dove dish soap to remove the cooked on cookie goo. I bought her a new pizza stone and then went crazy on her old stone. I cleaned with comet and dish soap. Then I rubbed it with brown scotch bright until it was smother than new. Next I decided overkill was the best way to remove all doubt.. I used my random orbital sander with 120 grit sand paper to clean it to look like had ever been used and smoother than new. Finally I reapplied vegetable oil and heated to 200 degrees. The “ruined” Pizza stone bakes cookies and pizza better than when it was new and we used again tonight. To keep it clean I just rub it with green scotch bright. If you get too much of a build up, use brown scotch bright (which is a higher grit value than green) and water.. If it gets too clean just re-oil it.
Pat Sullivan
Rachel Lynn says
Pat, I have to give it to you for using the sander. lol That is creative! One tip though, be careful using comet on a stone. They absorb whatever chemicals you apply on them, and then release it when you cook. Which is why I don’t use mine for baking cookies. They end up tasting like grease. ;-)
Tracy says
My large bar pan was left in my kitchen when I let a friend live there for a while. I don’t know what she did to it, but it is black and gray after being scrubbed with baking soda and vinegar! That didn’t do a thing! This stone did not have anything crusted on it, obviously she had gotten the crushed off but underneath that was just pure, yuck stain. There was nothing I could do to hurt it because I sure was not going to cook on it looked so I sandblasted it in my husband’s bead blast cabinet! It came out better than I thought because actually, I thought it may break! I Events with an orbital sander to it, and it took off a little more of this grayish color out of it. Now I have done the baking soda with vinegar again, ha ha didn’t do a thing to this pan. And then took Oxsee clean vinegar a couple drops of Dawn dishwashing, liquid salt and lemon juice to it. It’s getting lighter! I’m thrilled to death. After it sits for the rest of the day and I scrub it some I’m going to take it back out in the shop and get the orbital sander back on it and it may be pretty again. What do I have to lose! My stone is the pampered chef family heritage, stoneware classic collection. It’s mini mini mini years old I couldn’t even guess! It’s been good and hopefully it will give me a few more years. So y’all don’t be scared to do things that pampered chef would not do to it! Lol! Keep on scrubbing and blasting and sanding!
Kimberlee says
This is so helpful!! I found cookware at goodwill for $3! I was shocked but the entire backside and edges are covered black. I’m gonna try this method and hope for the best! It it’s the original Hamilton collection and I’m excited to try to restore it.
Jeanne says
Baking soda cleans well, and has the added bonus of helping with the smell. I wet the item, and sprinkle liberally with baking soda. I let it set for 5-10 minutes, or until I remember to check on it. There is enough abrasiveness in the baking soda to get off most of the gunk just scrubbing with my fingers (making the soda into a paste). Baking soda can also remove baked-on oils, and the smell that sometimes comes when oils go rancid.
When I was a PC consultant, I would demonstrate cleaning stoneware, often with pieces I had picked up at thrift stores.
My original pizza stone is 29 years old. Still looks great after nearly daily use.
Mouriana says
Agreed. The problem with soaps and other cleaners on stoneware is MOSTLY the chemicals left behind, and only a little the destruction of the seasoning (which can be fairly easily replaced.
Which brings me to my question:
My kitchen is small, and unfortunately, I had my PC glazed stoneware pie dishes stored too close to the sink when we were cleaning paintbrushes (bathroom remodel), and drips of watered-down paint got into the plates, which I didn’t realize until it was dried! Now I’ve scrubbed the plates repeatedly to no avail, and I’m terrified to use them because of the possible chemicals from the paint. I don’t think the oven clean method would work even if I could use it on the glazed stoneware, so I’m not sure what to do. I really don’t want to throw out the pans, but I don’t trust a sander, either! Help?