Remember the days when toys were made of wood and had a solid construction. Well, if you are nostalgic about things like that, then you will love this DIY. A family friend of mine recently made some adorable wooden boats. He has so kindly shared the instructions with me , of which, I am now passing on to you. This DIY wooden toy boat would make a perfect gift for a little one, or it could be a great project to do with a slightly older child.
(This post contains affiliate links. That means that I make a very small commission from sales that result through these links. All affiliate items used on this blog are chosen from products that I know and trust. You can read my full disclosure here. Affiliate links identified by an *)
DIY Wooden Toy Boat – Toy Nostalgia …
DIY Wooden Toy Boat…
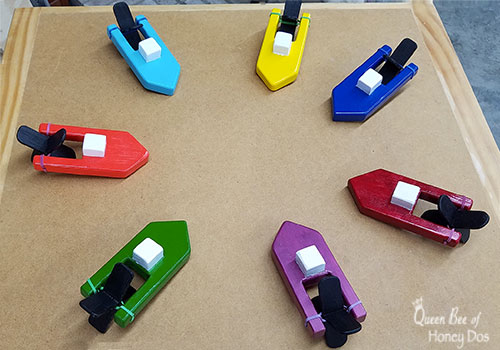
One of these wooden boats would make the perfect addition to bath time, pool time, or just in a nice rain puddle. Ahh… the takes me back. It really is such a kid thing to do – playing with a boat in a dirty rain puddle. And now, you can give your little one that same joy. ;-) But first, let’s go over the details.
Materials…
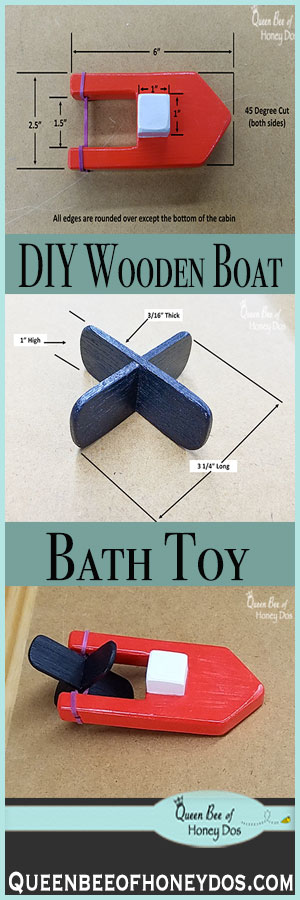
- Base – 1″ x 6″ x 2.5″ piece of wood (any solid wood will work – pine, oak, etc.)
- Cabin – 1″ x 1″ x 1″ wood block (use some left over wood, or cut from a square dowel)
- Paddle Wheel – 2 @ 1″ x 3/16″ x 3 1/4″ wood (slightly thicker than a popsicle stick)
- waterproof wood glue (such as Gorilla wood Glue or TiteBond)
- rubber band
- Sand paper or sanding block
- Non-toxic waterproof paint
(Martha Stewart recommends Liquitex Glossies paint* for painting toy boats. So, I feel comfortable in recommending these paints*).
DIY Wooden Toy Boat – Instructions…
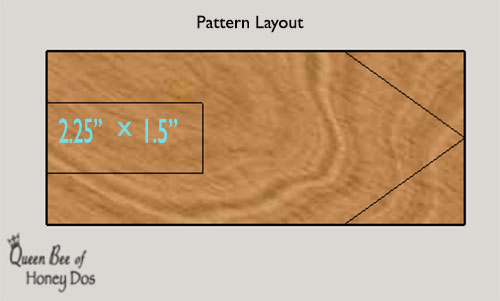
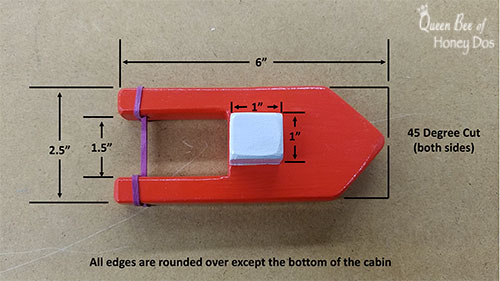
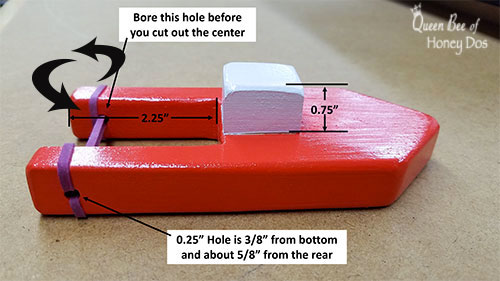
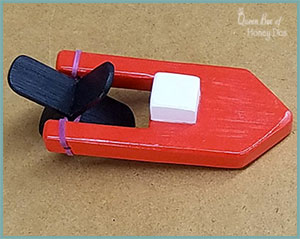
Step 1 – On the 1″ x 6″ piece of wood, layout the pattern for the boat to resemble the above image. Before making any cuts, you need to drill the hole out for the rubber band to through.
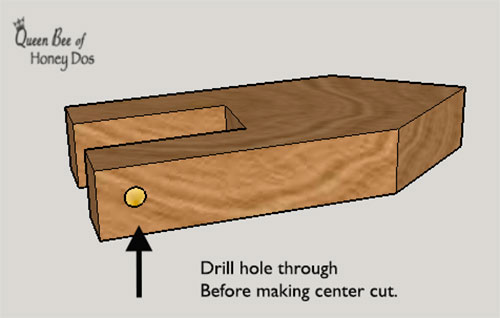
The location of the hole should be approximately 5/8″ from the rear and 3/8″ from the bottom. After, drilling the hole through, cut out the rear space, and cut the front at 45 degree angles.

Trace the 1″ square block above and centered over the cut out. This, is so that you avoid getting any paint in this area. Sand all corner down, then you can then paint the the boat bottom and block. (Do not paint the bottom of the block).
These boats were painted with some enamel paint purchased at Hobby Lobby. However, I know that many of you are going to want a paint that you know is non-toxic. I am sure that these are perfectly safe, but since I don’t really know the brand, I am suggesting a brand that is proven as safe. I have listed Liquitex Glossies* as a good alternative. You can probably find these at your local craft store, or I have provided several links to Amazon*, where you can order it.
After the paint dries, glue the block (unpainted side) to the cabin (unpainted space). Clamp in place and allow to drive thoroughly.
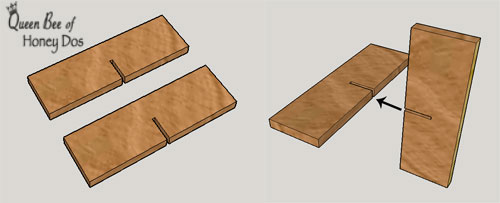
To make the paddle wheel, cut a 3/16″ wide x 1/2″ deep slot in both pieces of the wood. Then, add glue and slip the two notches together. (I recommend shaping the ends of the paddle wheel before glueing them in place). Let dry and then paint.
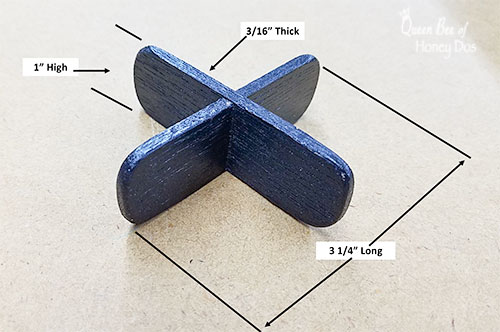
The paddle wheel should fit together snuggly and be flush with each side. You can probably make the slot cut with an utility knife, because the wood is so thin. Work slowly and carefully so that you do not over do it. Make small adjustments until the two pieces fit the way that you want.
To wrap attach the rubber band, insert the ends through the holes. The takes each end and loop it back around the end of the boat. The rubber band should be small enough to create a firm, but not over tight stretch.
Final THoughts…
I hope that you all enjoy recreating this DIY wooden toy boat for or with your own children. And, I hope that you will join me in saying thanks to my friend, Dale, for sharing the this project with us. Maybe we will be able to get him to help out with another project for us again, sometime.
– PIN IT –
– PIN IT –


Linda akin says
These are just too cute.
Rachel Lynn says
Thanks!