Last year, I posted a reveal of my home theater. As a result, I received numerous requests for the details about how I made my lighted movie poster boxes. I had initially planned to post the instructions for this DIY shortly following that reveal. However, I inadvertently deleted several images that were necessary to provide a good detailed tutorial. Well, fast forward to today. I stumbled across a few images that had been saved in the cloud. So, now I am able to put together this DIY on how to make a lighted movie poster box. Yay!
DIY Lighted Movie Poster Box…
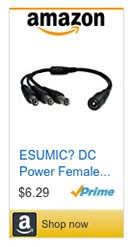
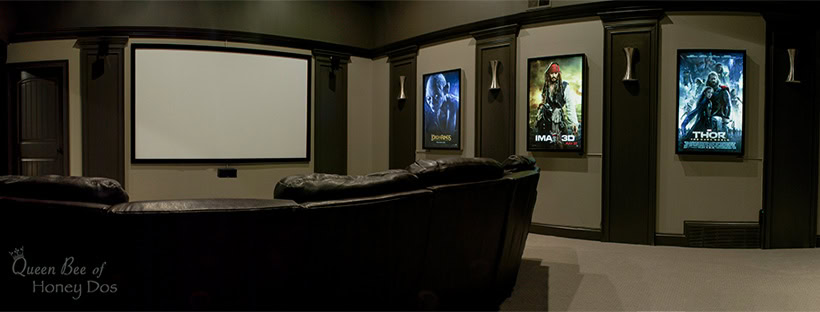
So just to refresh your memory (or to introduce it to those who haven’t seen it), this is the wall in my theater room that sparked all the requests. Frankly, I was a bit amazed at the demand since these images are so dark. (FYI – it is hard to accurately capture a theater room because, by nature, they are unlit, and adding too much flash destroys the mood).
(If you are interested in the columns, see how to make these faux columns, here).

Materials – Lighted Movie Poster Box…
For each lighted, movie, poster box you will need:
- 1 – Movie poster frame
- 3 – rolls of LED bulb strips
- 1 – DC adapter
- 3 – Power Jack Adapters
- 1 – LED Remote Controller
- 1 – 3 way male to female DC converter
- Roll of HVAC tape (this looks similar to duct tape but is very shiny – find it in the same aisle as regular duct tape)
- 1×4 wood for the box frame
- 1/8″ hardboard or plywood for backing
I am providing all of the links (below) to the exact products that I used to build my lighted movie poster boxes. Everything except the HVAC tape and the wood was purchased through Amazon. I highly recommend that you use these items. I tried a few others prior to finding the best performance, and this is what has stood the test of time.
FYI – It has come to my attention that the seller of the power adapters sometimes changes the item description pricing, and/or product listing. I have updated the link below, and the power appears correct. However, please make sure you check the amps (recommended 60 watts) to insure the item has not changed.
(This post may contain affiliate links (*). That means that I make a small commission from sales that result through these links, at no additional cost to you. You can read my full disclosure here.)
 |
 |
 |
 |
 |
 |
Lighted Movie Poster Box – Building the Box…
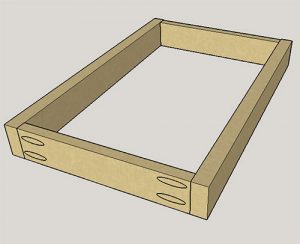
To create the frame, I used my Kreg pocket hole jig and Kreg pocket hole screws. I suggest that you use this method to assemble the box, because it needs to be sturdy and capable of holding the weight.(Note: Although my sketch-up shows the pocket holes located on the exterior of the box, you should place the pocket holes on the interior for better aesthetics).
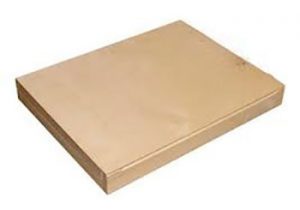
Next, glue and nail the back to the box. (I used 1/8″ tempered hardboard (i.e.pegboard without the holes), but you could also use plywood. The back dimensions are approximately 41″ x 28″.)
Once the box is assembled, you can paint it any color that you like. I suggest only painting the outer sides. There is no reason to paint the interior, and if you paint the back, you run the risk of it rubbing against your wall. I used the same color as my walls, so that the frame would blend in and the poster would pop.
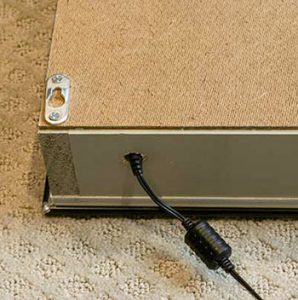
For hangers, I used keyhole hangers. This will mean that you will have to measure precisely when you hang the box, but they are sturdy and a safe way to mount these boxes. Place one in each corner.
Now is also a good time to drill a hole for the power supply to enter the box. I placed mine at the lower right of the box. However, you will want to locate this hole in an inconspicuous spot for your given situation – preferably on the side that is closest to your outlet.
Lighted Movie Poster Box – Interior…
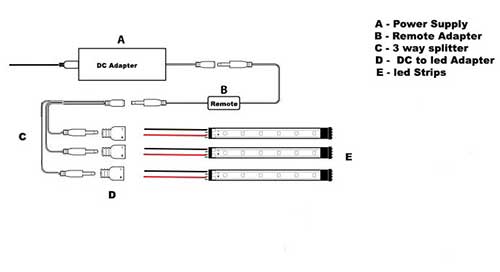
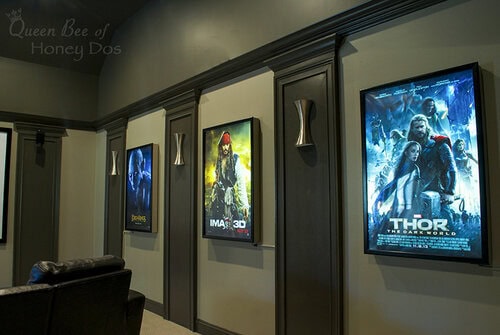
Take a close look at the wiring layout. Identify all the parts, and make sure that you have a clear understanding of the way all the connections are made before going forward. It’s pretty simple once you lay everything out and look at it, but knowing how it lays out will help you make better decisions on placement. (Do not connect them yet, just lay it out and get a feel for how they will assemble)
UPDATE: (6/10/2018) The LED strip manufacturer is now including a DC adapter at the end of their lighting strips. This eliminates the need for Part D ( 12 PCS Zitrades). However, if you order LED Strips different from the ones above, you may still require these.
Note About the lights…
Another thing to point out: I know that many people take my projects and make their own alterations to them. Normally, that is all well and good. However, I did want to address the possibility of choosing something other than LED strips for this project.
TIPS…
- DO NOT choose lights that produce heat. LED strips are cool to the touch and do not get hot. A lighting system that produces heat will create a fire hazard.
- Choosing a lighting source that offers fewer lights with a stronger output will cause hotspots. (such as puck lights). What I mean by that is the lights will shine very bright at the bulb, but will dim as the light travels from the source. This is very noticeable and you will not be happy with the result. You will be able to see exactly where the bulbs are behind the poster. So, I do not recommend this either.
- The same concept applies to the bar lights. Some people like to use fluorescent bars to create these boxes. In my opinion, this causes a banding effect behind the poster.
- Rope lights: I have heard of some people making a box using rope lights. While this is relatively safe, you should know that it takes A LOT of ropes to create the amount of light that it takes to display a poster. You will have to pack the box full with them. This causes the box to be very heavy.
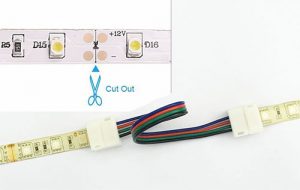
- One tip on using LED lights: The ones that I used came with a waterproof cover over the strip. You can remove that if you choose. Removing the rubber will allow you to make turns and bends easier. To remove the cover, peel back at the end, carefully separating the cover from the LED strip. Otherwise, you can use the HVAC tape to help hold the strips down at the turns, as I did, by placing a small strip of tape over each turn.
Back to the Construction…
Before placing the light strips in the box, connect the DC adapter, the remote, and the 3 way adapter. Then, tape them down in the location where you drilled your cord access hole.
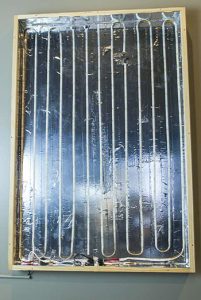
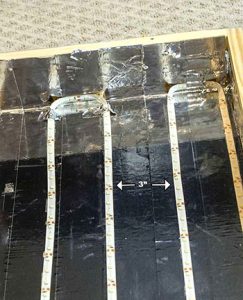
Now, connect one roll of LED strips to a power jack adapter (AKA – DC to LED adapter), and plug one of the 3 way male ends into it. Then, begin to stick the strip in rows along the length of the interior. Start at the side closest to the 3 way male that it is plugged into.
The strips should be placed so that they are approximately 3″ apart. It doesn’t have to be perfect, but you don’t want to have obvious changes in width.
As you get near the end of the roll, you want to make your LED strips stop at either end of the box . If you need to, you should cut off the excess lights along one of the cut lines to force it to stop at one end of the box. You do not want to have the strip end in the middle. You should be able to get 4 – 5 rows out of each roll of strips before needing to create a stopping point. If you allow your run to end in the middle of the box, you will have a gap in your lighting.
Once you finish with the first strip, repeat the process for another strip of lights – beginning the run at the end of the box where the splitter is located. Repeat again for the final strip of lights.
Connecting the Poster Frame…
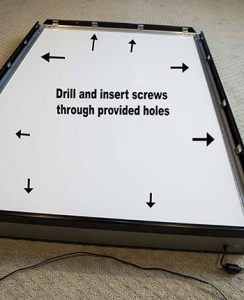
There are several reasons why I chose this frame for the box. One of which is that it already has several pre drilled holes through the metal frame. So, once the interior of the box is finished, you need to lay the frame on the box and lift the snap fronts up. Then, mark the location of the holes onto the box and pre drill your screw holes through the box. Now, all that is left to do is to screw the frame to the box. FYI – I used 1″ wood screws for this.
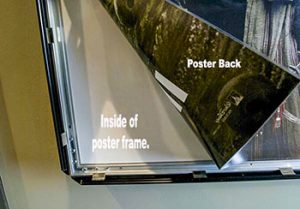
Other reasons why I chose this frame: If you are considering using a different frame, I just want to let you know that the reason this one works best (other than the pre drilled holes) is that it already has a mylar sheet for a back. (That is the white backing that you see here). What this does is diffuse the lights to create something similar to a photographer’s soft box. If you choose to use a different frame, you will need to purchase a mylar sheet for this purpose. I priced it all out, and it was going to cost me about as much to make a frame as it would to buy this one, so I figured, “why bother.”
Another plus for this frame is that it opens from the front. This makes it easy to switch out the posters. If you do not have a snap front frame, you will be forced to remove the entire frame from the box every time you want to put up a new poster. Believe me, once you get it mounted, you will not want to have to take it down.
About the Posters….
I also wanted to let you know (for those who are unaware) about what type of posters to buy for a lighted movie poster box. You can’t go out and just buy any old poster. Well, you could, but it isn’t going to work well.
I should note that double-sided posters cost a bit more than single sided posters, but most are not too much more than a regular poster. You can get them on Amazon or even Ebay. If however, you decide that you don’t want to pay extra for a double-sided poster, I can tell you a few posters that will work okay for single sided.
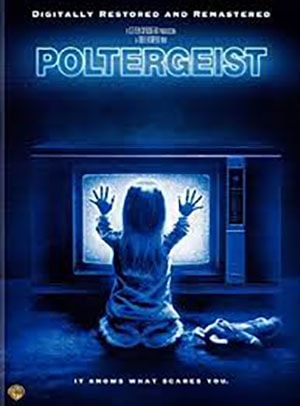
(FYI – This poltergeist poster is very hard to find as a double-sided. I have the single sided and it looks very much like 80ish TV in the light box. Sort of cool, but it doesn’t look right up against my DS posters). The best way to compare them is that the single sided poster quality is like an old 80’s big box, tv screen. The double-sided poster is like a 1080 LCD screen. ;-)
Don’t Forget Your Candy!

My go to place for stocking up on theater candy is DollarTree.* Yep, I said it. DollarTree! Why? Well, I can order the candy by the case and of course, everything is a dollar. I love just getting the big box of candy in the mail. At this point, I think the neighborhood kids are looking for my box to arrive, too. ?
The candy is always good quality, and it is just so convenient to order everything at once and then have a ton on hand to restock my supply. I highly recommend that you give them a try* for this vital theater room supply. FYI – they do require that you buy a minimum of 12 (or a case) for each candy. But again, that is what makes it so convenient.
Final Thoughts…
Some of the best looking DS posters out there are Disney cartoons. Finding Nemo is a popular choice, and looks like an aquarium. I personally love the Jack Sparrow poster from the image in this post. His eyes seem to glow. But whatever you choose, you will find that the price range on posters runs from around $20 all the way into the hundreds for some. (DS posters are collectibles – something I learned during this process. So at least they may one day be worth something). If you need some ideas for movie posters that will work well in the boxes, you can check out this list here.
I know that there are probably other tutorials out there for making a lighted movie poster box, but I hope that this one offered you a simple and easy DIY. I spent around $120 for each of my boxes. If you search for purchasable versions, you will find that they are quite expensive, some are well over $1,000. If you build one of these, let me know how it turns out. :-)
UPDATE:
The good folks in Canada seem to be having problems with the links above redirecting them to the exact product on Amazon.ca. So, I am providing these links for my Canadian visitors. Please note, that these are not the exact brands that I used. So, I can’t vouch for the quality. But, they are good alternatives.
LED Light strips* – If you go with a different seller, just make sure that you buy 3 of the same brand/brightness for each box. Mixing suppliers may cause the lights to vary in color.
DC Adapter* – It was hard to locate an adapter via the Canada store. There are not very many with good reviews. This one appears to be the best. It is adjustable to fit any situation. You will need to set the volts to 12 on the power pack.
3 way Male to Female Converter* – This is the only one that I could find. It looks to be high quality, but it doesn’t have many reviews. A few things to point out about this model. It is a bit longer than the one that I used, which means that it will take up more space. Also, this model has a locking collar on the male ends. That will most likely need to be removed to allow it to connect properly to the Jacks. You will just need to use a sharp blade and cut around the rubber collar that sits on the male tip. Then, remove it to expose the full tip. If you are not comfortable with this alteration, I would suggest going to a local electronics store to pick up a 3 way adapter. Since I am suggesting an alteration to the product, I must ask that you read my disclaimer. (which is just the legal document that says, I am not responsible if you mess it up or hurt yourself). ;-)
Movie Poster Frame* – This is the exact poster frame that I used. Unfortunately, it looks like it is currently unavailable. However, I am providing the link so that my Canadian followers can save this in their wish list or watch for it to become available again. I will check with the provider to see if/when they will be making these available, and provide an update when I get an answer. (I am unable to locate a substitute for this project).

– PIN IT –
– PIN IT –
Linked up with Remodelaholic and hertoolbelt
Zovesta says
Holy cow, what an amazing job. I almost thought of making one for my sister and brother in law until I got to the double sided movie poster part… that’d be out of my gift-making price range! ;) Thanks for the instructions, you’re too dang clever. Maybe if I come across a double sided poster one day, I’ll know what to do with it! :D
Rachel Lynn says
Thanks Zovesta,
The double sided posters that I am using cost around $20 each. I think the Jack Sparrow poster was a bit more. hmmmm…. maybe I wasn’t clear about the cost. There are definitely some that are super expensive. But, you should be able to find a large selection of reasonably priced ones. Let me know if I can help. :-)
Jenny says
This is such a cool idea! I’ve just had a look at your post on your home movie theatre reveal and it’s fantastic! I’m so envious rn.
Rachel Lynn says
Thanks Jenny,
It was a lot of hard work, but I am pleased. :-)
Debbie says
WOW!! So cool! I am definitely pinning this to do in my new house! We have a theater type room right now and this would be amazing for it. Thanks so much for the tutorial. LOVE it!
Rachel Lynn says
Thanks Debbie! You have some amazing Pin worthy stuff on your site, too. :-)
Angie ~ Ambient Wares says
Wow! That’s really all I can say. This is such a thorough tutorial and I can’t believe how awesome your lighted movie posters look. I have definitely pinned this and can’t wait to see the options out there for double sided posters. These would make wonderful gifts and I would be the coolest aunt out there ;)
Rachel Lynn says
Thanks Angie. All the neighborhood kids around here think they are really cool. So yeah, coolest aunt in the world! :-)
Barry says
Hi Rachel,
I used your instructions to put one of these together today, and it looks fantastic. Wanted to say thanks for putting the guide together.
Rachel Lynn says
Your welcome Barry,
I am glad that it turned out the way that you wanted!
Chris says
Hi and thank you for this excellent tutorial! I am using a wide format printer to print two 16 X 20 backlit posters on HP backlit paper. Actually, the “posters” are custom graphics (wedding photo and a man cave sign). I am using premade 3″ dimensional frames that will work. I’m excited about this project!
I have two questions though:
1 – The frames do not include mylar inserts, and I’m having a difficult time finding exactly what I need. I have access to various craft stores, office supply stores, and photography stores; however, I’m not sure as to what exactly I’m looking for. Any suggestions?
2 – For these two posters, I’ve committed to using the electric power suppply, but I was wonder if you have ever created battery-powered backlit posters? If so, what modifications would need to be made?
Thank you again for this thorough tutorial!
Rachel Lynn says
1)If you are going with mylar, you need it to be white not the semi frosted. The thickness doesn’t matter. You just need something that will allow the light to pass through. However, you could also use anything that would create a softbox light effect. Right off the top of my head, fluorescent light covers comes to mind. You may be able to pick up some of those fluorescent cover sheets at Home Depot or Lowe’s. I have never tried to cut one of those, so I can’t say how difficult it would be. You might also try a piece of frosted glass behind the poster. Another option would be to staple/attach soft box fabric to the box – basically anything that will create a filter before the light reaches the poster. 2) I have never used batteries for these, but the only thing that I can think of would be to build it in a way that allows the batteries to be changed without having to remove the frame from the box.
Leon says
Hi,
That you so much for this tutorial. I am planning to do a couple this week modifying for 16×20″ frames. Is there anything you would recommend modifying for smaller frames? Also, I don’t think I read anywhere about the remote. I see from the amazon link that it is dimmable and has the ability to turn the lights on and off. Do these functions work? I especially want to make sure that they are very dimmable.
Thanks for all your help!
Rachel Lynn says
For a frame of that size, you probably only need 2 rolls of lights for each and this 2 way splitter. You can also get the snap front frame in a 16×20, here.Yes, the remote is dimmable. It goes from low, medium, to high. Of course, I can’t say if they will go as low as you have in mind. But, this was the only dimmable remote that I found that gave consistent results. Good Luck! :-)
Ben says
Just FYI your Amazon link for the strip lights is going to a roll of blue LEDs. I had to dig around a bit to find the white ones…
Of course I did that after mistakenly ordering the blue ones. Oops… I can only blame myself.
Rachel Lynn says
Thank you Ben! I have corrected the issue. Sorry about causing you the temporary delay.
Ben says
Another minor point — the Zitrades LED 5050 RGB Strip Light adapters come in packs of 12 which isn’t very clear when you go to Amazon. So I wound up with 36 of the things instead of 3. :) Thankfully they accepted my return of 24 of them…
Rachel Lynn says
lol You sure are having a time of it. ;-) But, that is a good point. The Zitrades have 12 per pack, so one pack will be enough for up to 4 poster boxes (for other’s reading this comment). And thanks again for bringing the light issue to my attention.
Chad says
I know this post is a few years old now, but thank you so much for the clear guide. I built a frame a couple months ago and love it: https://photos.app.goo.gl/Pb4uN9wo5biksrGE6
Rachel Lynn says
Your welcome. Nice job! And post age is not a problem here. As long as the comments are open on a post, I will respond. ?
Dennis says
Hello Miss Rachel,
This is an outstanding write-up!! I will definitely be following your lead on this project! One thing I’m not clear on. Did you daisy chain all the boxes and connect them to a switch? Just trying to understand how they are all powered? Thanks in advance.
Rachel Lynn says
Thanks, Dennis. They are not daisy-chained. Each box is plugged into its own individual outlet. I have my remotes velcroed to the bottom of the box and use it as a switch. But with today’s “smart” features, there are all sorts of possibilities.
Anonymous says
Hello miss Rachel,
Thanks so much for the response! Can’t wait to get started on this. Thanks
Robert says
good afternoon. first off thanks for the instructions. question on using the Kreg. could you share what depth size you used? sorry if that is not the correct term. im looking to purchase the Kreg, and I’m just starting to learn about it.
Rachel Lynn says
Hi Robert, The Kreg jigs come with the settings printed on the jig. You just set it to the thickeness of the wood that you are using. For instance, this box is a 1″ x 4″. So, the actual thickness is 3/4″. I set the jig on the 3/4″ depth and drilled. Then, attached with 1 1/4″ screws. FYI – it will also have a guide that tells you which screw length to use per wood thickenss. Kreg jigs are AMAZING and great for any woodworker, but they really shine with beginners.
Robert William Jr Oelschlager says
Thank you so very much for that information. As a newb when it comes to construction of any kind. For wood that that is listed as 1” why is it 3/4”?
Rachel Lynn says
All wood is listed in the store with its nominal measurements (the size originally cut). But, before it gets to the store, the wood goes through a drying process and a process of planing to remove saw marks left from the first cut. All that reduces the wood to its standard (actual) dimensions. For instance, all 2x4s are actually 1 1/2″ x 3 1/2″. It will eventually come naturally to you, but to help you out a bit now, remember when sites refer to a wood size, they typically are giving you the nominal dimensions. If they refer to a “cut list” or a “cut size” they are giving you the actual dimensions.
Robert says
thank you again for your reply. I was wondering if you would be able to answer one further question. I’m planning on adding a second smaller frame below the movie poster. in essence im adding a “NOW SHOWING” sign below. im thinking I will need to add a smaller wood board where the movie poster frame and the smaller now showing frame meet in order to prevent any light from the led lights escaping through (as I dont think the frames will fit 100% flush with one another. do you happen to know what is the measurement is between the two sides of the created light box? I’m not sure how to work out that math. thank you again, and no worries if you are not sure or if my question doesn’t make sense. my thanks.
Rachel Lynn says
Robert, I am not sure that I understand exactly what you are asking. It sounds like you are trying to butt two frames against each other. Going off the way most of the boxes are designed at the theaters, I assume your concern is that the snap frame would infringe upon the frame that you will be placing on top of the “now showing” box. Using my plans, the snap frame has a very small amount of overhang. If I were doing this, I would build this as one box. You would need to make the sides longer and add a divider where the two frames will meet. The length will be the combined length of the frames. You can use a thicker piece of wood for the division. How much thicker will depend on the surface space needed to fit both frames.
Anonymous says
Good afternoon Rachel. thank you for the reply! that helped!
Emily says
Hi Rachel! Thanks for making such an amazing guide. I do have a question though. Do you think it would be possible to attach hinges on to the frame to make the LEDs more accessible? I’ve seen other people do it, but it was with other brands of frames. Thanks!
Rachel Lynn says
Emily, anything is possible. ? You may need to do a bit of searching to find the best hinges and a bit of finessing to attach them, but I don’t see any reason why you wouldn’t be able to make it work. I will tell you though, that I have not had to open any of mine in all these years. But assuming you might have to at some point, I imagine the work to remove the frame (as is) will be a lot less work than installing hinges now. IMHO.
Danielle says
Morning,
I am building one of these as a gift for my daughters whom have bought a house together. I am wondering if I can buy one super long strip of lights instead of 3 -16′ sections.
In Canada these are 32 for each and a super long one will run me $40. It’s more affordable to do the long strip but I don’t want to compromise the look…. What are your thoughts?
Thanks
Rachel Lynn says
Danielle, I guess it depends on the strength of each bulb. My boxes have approximately 44 feet of the total 48 provided with the 16-foot strips. You could probably get away with less than I used if you space them a bit farther apart. Be mindful of the DC power wattage required for your particular setup.
Gregory says
Hi
I have two questions:
If you had to do this all over again, would you use the same parts, including the same LED’s? 5 years is a long time in terms of technology!
Secondly, do you think these are the right amount of lumens compared to movie theater light boxes? I’ve seen some people using as high as 6500K and I think this is a mere 240 lumens, unless I’m mixing up different descriptors.
Thanks!
Rachel Lynn says
If I did it again, and I likely will, I would absolutely use the same setup. I built a few other boxes before the one in this post and discovered issues that were resolved before I made the one that you see above. The only thing different that I would do is I would give them their own designated light switch and possibly look into some of the smart (Google/Alexa) controlled applications. To address your question on lighting – there is no comparison between Lumens and Kelvins. Lumens are the brightness of a bulb. (Each lumen puts off the same amount of light as one candle.) Kelvins measure the color temperature. For instance, a 6500k bulb will be bluer than a 3000k. As far as comparing to a box seen in the movie theater – you have to take into account that those are in a much larger space than any standard home theater would ever likely be. They are also displayed against a commercial lighting background. So they are quite likely running on many more lumens. My home theater is quite large (20ft x 24 ft) and I run these on the medium setting with ambient lights in the background. If you were going to have them compete against a well-lit room, you may want to look into more lumens. I would recommend using more and placing the strips closer together to achieve this. I would, however, not recommend using stronger individual bulbs. As explained above, the light must be able to evenly disperse to avoid hot spots.
Gregory says
Rachel thank you! I’ve got one more question for you. I’m thinking of having a friend build these for me. But shipping could be discouraging. Do you know how much the finished product weighs, approximately?
Rachel Lynn says
Gregory, Not precisely. But it is quite heavy compared to other wall art. If I had to guess, I would say between 5-10lbs. Most of the weight will come from the wood, and since weight can vary by species and moisture content, that is as close I could call it.
Laurence says
Thanks so much for providing such a clear tutorial on making this cool project, with links for all the supplies. My only concern is that the power supply you recommend doesn’t seem adequate for the lights you also recommend. Three rolls of the LED strips you link to will draw 4.5 amps or 48 watts, while the power supply you link to above is only rated for 3 amps or 36 watts. I’ve also read that, to avoid overtaxing your power supply, you should get one with 20% more capacity than the maximum you might use. With that in mind, this looks like a better choice: [link removed by moderator]
Rachel Lynn says
Larence, The power supply wattage has already been addressed. But nice try at getting your affiliate link posted.;-) lol
Sion Michel says
Thank you so much for such a detailed tutorial on building the lightbox! It turned out incredible and I built it to your specs and instructions. Works a charm. Your generosity, presentation and tone of the instruction was so easy to get into and follow. Have a Blessed day.
Rachel Lynn says
Sion, Thank you. I am thrilled that your build turned out great.
Brandon says
I built one yesterday thanks to your tutorial. Thank you soooo much. It looks sooo awesome. I’m a school teacher so $300-$400 for a frame wasn’t happening. It ended up costing me at about $150, and that’s with the crazy new prices of lumber. ThNks again.
Rachel Lynn says
Brandon, so glad you enjoyed the project. But yeah, even with crazy lumber prices, it is still way cheaper to build your own. Plus, you get the bragging rights. ;-)
Donna says
Thank you for these wonderful directions. It seems very clear and easy to follow. But I have one question. Do you think this might work for a lighted box to display a stained glass on a wall? Might I need to add something to disperse the light better?
Rachel Lynn says
It should work just fine for lighting a stained glass, as long as you can fit the glass into the frame. Without checking, I can’t tell you how much thickness the frame will accept. But considering that it is meant for posters, you may need to do some sort of work-around or use a very thin pane of glass.
Rebekah says
Thank you for this tutorial! I’m thinking of using a foam board backing instead of plywood to help absorb the sound. Kinda like a sound panel. Trying to kill 2 birds with one stone, lol!
Thanks again!
Chris says
Great job with the tutorial. I’m curious as to how much the movie poster frames used to cost when you originally posted this as now they are $158 on amazon. I know you mentioned your total cost per box was $120. I’m wondering if it’s worth starting now while prices are apparently insane everywhere.
Rachel Lynn says
I don’t rememeber the exact amount, but yes, everything has gone up since I built these. However, building your own is still significantly cheaper than buying.
Diane says
Hey there. I have a wall that I want to place 3 lighted boxes and columns. I am having the new house wired today. How far apart did you place your outlets and how high? My wall length is just under 20 ft. I have storage behind that wall where I initially thought to put an outlet and later feed through the wall.
Rachel Lynn says
I find the outlets are best placed close to either the top or bottom edge of the box location, whichever one will be more likely to hide the outlet. Usually, no one will be able to see the outlet in either location unless the are extremely tall (top mount) or they bend down to look under (bottom mount). However, if you have young children, you may prefer the outlet to be up top to prevent curious fingers from getting into trouble. You will also want to take into consideration where your plug is coming out of the box. To get the exact location, you will need to first determine where your boxes will hang. (Mine are at the center of each bewteen-the-column space with the top edge at approximately 72″ off the floor). For reference, the standard decor rule is for the center of artwork to be between 57″- 63″ off the floor, which is eye level. You would go with the higher end of the range for high ceilings and/or long vertical pieces.
Lacreatia says
Very nice I made one but a lil different. My question for you is do u have a remote control fr each box cuz if so that’s TRAGIC!!!🤷🏾♀️lmn. I’m trying find an easy way to connect all to one without wires showing and use one remote
Rachel Lynn says
I have my remotes mounted on the bottom of the boxes, so that I can just walk by and push each one on. However, I do think it is better in most cases to wire the outlets up to a light switch if you plan to keep the boxes as a permanent feature. You can also sync the lights to work on a single remote.
Elizabeth Knowles says
Hello 👋
I just made this poster box with your instructions and materials suggested. If I keep the white backing of the frame, the lights won’t come through. This poster also came with a clear pvc sheet that can be used on the front but we had to place it on the back of the frame which would make the frame completely see through and then you can see the lights coming through the poster. But this makes the frame flimsy, I know I’m going to screw it to the box but I’m afraid it will still look flimsy on the front where the poster is supposed to look taught. I see you have the white backing that the frame came with but when I did that, no lights showed through the poster. Any suggestions ?
Rachel Lynn says
This plan uses double sided posters. But even with regular posters, you should have plenty of light. Did you use the recommended strands? If so, check your connections. You must have a power loss somewhere.
Ricky says
Do you have links to the US Amazon items?
Rachel Lynn says
Ricky, they are included above in the post.
Ricky says
Awesome! Thank you. Also one more question. Why did you go with 1×4? Would 1×3 work so it’s a lower profile?
Rachel Lynn says
Yes, 1×3 should work just fine. I was going for the same size as seen in theaters at the time. Also, I wanted mine to standout between my columns which are 1.5″ deep.
Bonnie Johnson says
Thank you for this fun post!! Is there a link for the exact frame on US Amazon? I keep looking for it in your post and can only find Canadian. Thanks in advance!
Rachel Lynn says
Bonnie, Yes the exact frame from US Amazon is listed in the tutorial.
Jennifer says
Great instructions – thank you! However, several of the linked products are no longer available. Do you have suggestions of substitutions?
Rachel Lynn says
Jennifer, this post is quite old and the products have changed or been removed several times over. But because this is such a popular DIY, I have updated the items throughout the years to try to keep up with these changes, but they soften change without my notice. For the most part, all items can be substituted with a different brand.
Jake says
Hello. Thank you very much for the tutorial. I made four LED frames almost 5 years ago and want to give you a big thanks for inspiring me to hopefully one day build a home theater. I also built a 4ft x 6ft LED frame for bus shelter/IMAX posters based on your tutorial with different sizes and quantities and it is one of my most proudest accomplishments. Feel free to check out some of my photos I posted on Flickr.com (search people: jakesweet90)of the LED frames (with posters in them) should you be interested. Thank you again.
Tony Kiessling says
Thanks for sharing your ideas on making a light box. I recently was gifted a double-sided movie poster and wanted a proper light box. Google search led me to this site. It took a little while to obtain the necessary parts and to assemble the light box. I couldn’t be happier with the final product which now hangs in my home office. I will likely make at least two more for members of my family.
Thanks again!
Justin says
Thanks for the awesome write up, I usually never comment but this helped tremendously.
For anyone building this more recently, I used 32.6 ft (3m) Govee rgbic light strip on the inside which gives you an in-line on/off selector and you can use the app to configure it. They’re usually on sale on Amazon for around $15-20.