Do you suffer with drafty windows regardless of the attempt to correct the issue? If you tried to insulate those drafty windows by adding weather stripping or plastic sheeting, but you still have cold air getting in, odds are that your window frames were not insulated.

(This post may contain affiliate links (*). That means that I make a small commission from sales that result through these links, at no additional cost to you. You can read my full disclosure here.)
It is very common for many homes to be missing this very important feature. I have yet to live in a home where I didn’t have to do at least some type of upgrading to the windows’ insulation.
To start with, this is the window that I will be using for demonstrative purposes. This is my son’s room. We have been having issues with it being cold in here, despite eliminating other possible causes. So, I am thinking that I need to delve into this windows insulation to see what the issue is.
Back when we were building this house, I had to make a call for the insulation crew to return to insulate around the windows’ frames. They had already been out and “finished” their work, but had ignored that all important 2″ of space around the windows. (If you don’t know what I mean, I will expalin in just a bit)
Ignoring this space wasn’t really their fault. Afterall, this was the way that they had been doing the job for all of the builder’s grade homes that they had worked on previously. But, this was a custom job, and since I was the one writing the checks… okay, you get where I am going with this.
However, on the day that they returned to correct the issue, I arrived at the construction site late. As luck would have it, the sheetrock crew were hard at work and had already sheetrocked almost all of the house. I also noticed that the insulation crew had come and gone. (hmmmm…)
I could see that they had insulated around the few windows that were still lacking sheetrock. So great, right? Except that a couple of windows had already been sheetrocked, and I couldn’t tell if the insulation crew beat the sheetrock crew to them.
They assured me that they had, but now a few years later and my suspicion is that they didn’t. This window was one that I couldn’t inspect.
How to Insulate Drafty Windows
Materials Used:
- Great Stuff Window and Door Foam Insulation*
- Caulk
- Utility Knife*
- Pry bar*
- Nail gun or finishing nails
So, to begin: Using a sharp utility knife, score along the caulking around the window. Make sure to completely score the entire length thoroughly. This will prevent the sheet rock from tearing, and destroying your walls.
You can see that I have already removed the lower trim, and sure enough, I immediately felt cold air. I could see just a pin prick of sunlight coming in beneath the window. So, its a good thing that I decided to do this job.

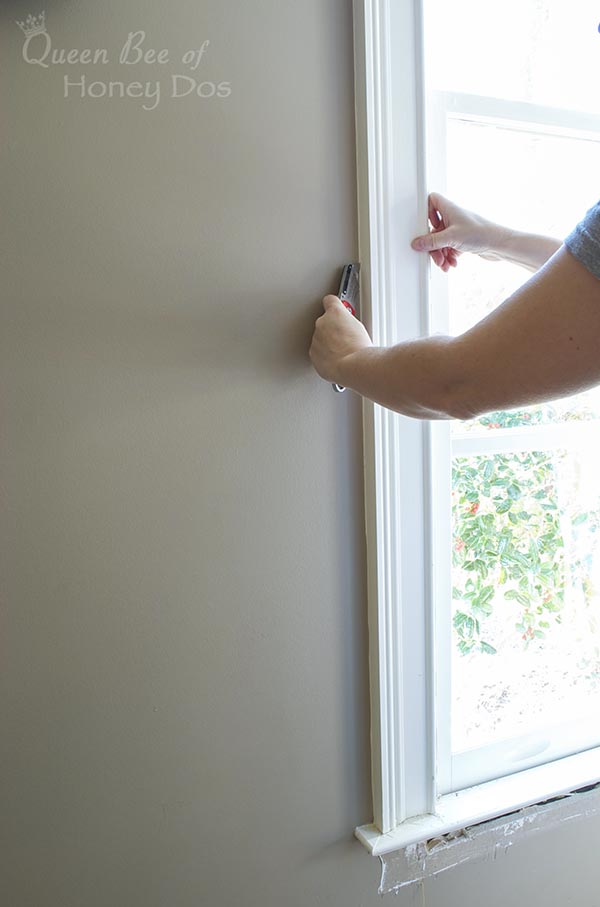
Before moving on to the next step, I wanted to go over the importance of using a correct pry bar. I have seen people try to pry trim off with flat head screw drivers before, and it always results in damage to the sheet rock.

If you take the time to use a small pry bar, you will have much better results, and significantly less sheet rock repair. Or even better, check out my post on removing molding without causing damage. If you need a good pry bar, this Tekton will work. It has the curved end that you see here, and the other end is flat for prying trim.
Next, begin to pry the trim loose, working your way from one end to the other. Just pry a bit at a time as you continue to work your way up and down. Don’t try to pry too much in one spot. The idea is to work it slowly loose, increasing the gap in increments.

There will be a nail at the top corners and at the bottom. Once you have worked the trim loose enough to pull the corners apart, pull the trim away from the top. Then, pull up from the bottom to remove the trim.

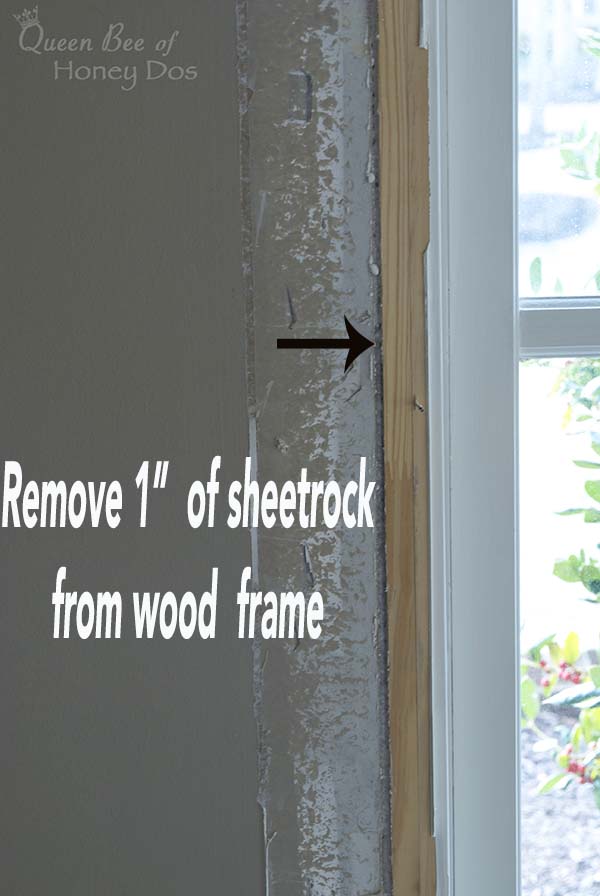
This is what you should see once the trim is removed. You will need to remove about 1″ of the sheetrock away from the wooden frame. But don’t worry, it will not show once you are done.
Remove a small section to see what is behind the sheetrock. Be mindful of the location for security system wires. I used a utility knife for the areas that I needed to avoid wires.
A utility knife will not cut as deep as a sheetrock saw. So, although it takes more passes to get through the sheetrock, you don’t have to worry about hitting anything.

This is what my window looked like after I removed the sheetrock. You can see the security wires below the window. You can also see the lack off insulation.
So why just 1″? Well, if you stick your finger inside the space where the sheetrock was, you will feel that there is a stud just beneath the new edge of the sheetrock. So, you are going to want to fill that space between the wooden frame that you see and the stud that you don’t.

If you could see it without the sheetrock, it would look like this image via the Family Handyman. Fill the gap all the way around the window with foam insulation. I use great stuff, but regardless what brand that you use, keep one thing in mind.
(IMPORTANT!) Make sure that the foam is labeled for windows and doors. Do not try to use regular expanding foam. It will warp your windows.

Once the foam has completely dried, use your utility knife or a straight blade to cut the insulation flush with the sheetrock. This is my window after I had trimmed the foam. (and before clean up) :-)

Before reattaching the trim, make sure that all the old nails are gone. It is best to pull them through the back instead of trying to push them through the front. This way, you will not damage the face of the trim.

Now, you can reattach the trim. Make sure to line it up with the old edge marks. This will ensure that the boards realign back the way they were, and you get a tight fit.

Finally, caulk the edges and putty the nail holes. Then, touch up the paint and you’re good to go. A nice, cozy, and draft free window.
FYI: Also insulate those outlets, and if you are having problems with your doors being drafty, check out my repair page on fixing those.

Pam says
Do you have a fix for drafty windows that do not have trim molding around them? We have no molding/trim around the windows. New replacement windows were installed approximately 7 years ago but you can still feel the cold air around them.
Rachel says
Yes. If you do not have window casings, you will want to access the empty space around the windows with the least amount of damage to the drywall. I would suggest using a small drill bit to drill holes through the sheetrock around the perimeter. You can then insert the foam straw into the holes and fill the space. (start at the bottom) I would suggest drilling every 10 inches or so. When done, spackle over the holes, sand smooth, then touch up with paint. (use the smallest bit that will allow the straw to pass through). Good luck!