Every woodworker needs to have a way to flatten wood. If you think this requires you to own an expensive piece of equipment, you would be wrong. There are several options available for every budget. Each has its limits, but each can be used to create a nice flat surface to any wood plank or board.
Obviously, some tools are faster and easier to use than others. Some tools are better fitted to particular jobs. This goes without saying.
But you should be able to find a solution below that fits your needs. You may have to weigh the cost against the amount of time and effort that you are willing to put into your woodworking.
(This post may contain affiliate links (*). That means that I make a small commission from sales that result through these links, at no additional cost to you. You can read my full disclosure here.)
I always recommend that you invest in the faster tool when you are doing woodwork as your business or when you want to mass-produce.
If you are doing a one-off project, I recommend going with the tool that will get the most use in your workshop.
For instance, someone who frequently does furniture refinishing would most likely benefit from a quality sander. Someone interested in detailed millwork may benefit from purchasing a router.
Benchtop Thickness Planer
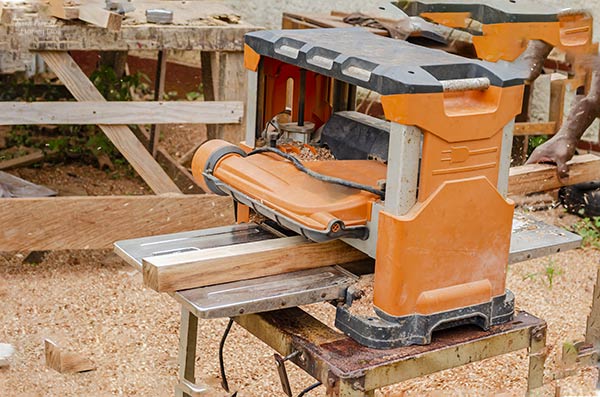
This is the go-to for any woodworker looking to mass-produce. While they are very nice to have, I wouldn’t go out and buy one just for one project.
However, if you do a lot of woodworking, and you are ready to add a big-ticket item to your repertoire, these make life so much easier.
The only downside, besides the price, is that most benchtop versions can only plane wood up to 12-13 inches wide. The only way around the width limitations is to purchase a much more expensive, commercial-sized, planer.
Recommended Thickness Planers:
- Craftsman Benchtop Planer* (budget-friendly for the occasional user)
- Rigid 13” Thickness Planer (good, solid, middle of the line planer)
- Dewalt 13” Planer* (my top choice)
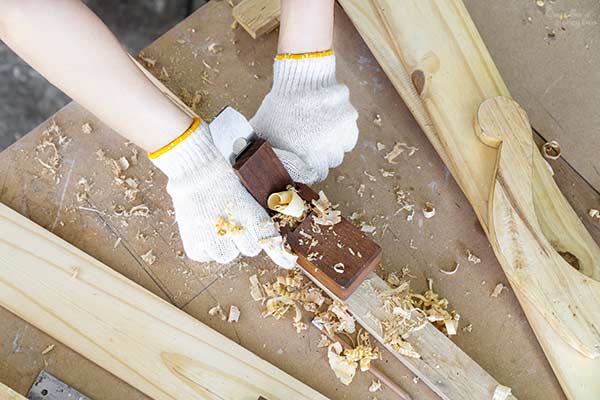
Hand Planer
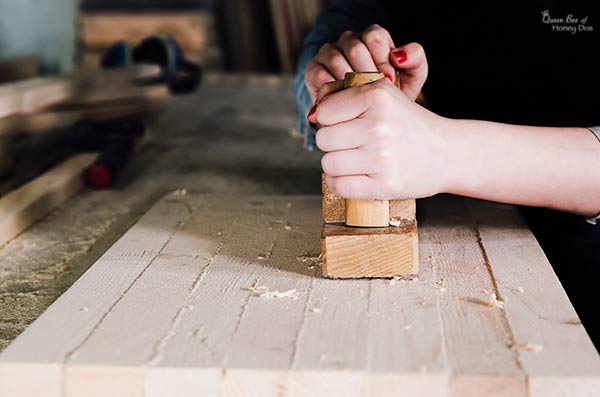
These are great if you want to continue the craft of hand carpentry. Anyone interested in hand-crafted carpentry will definitely have more than a few of these lying around.
For beginners or that one-off project, you may find that they require more effort than a belt sander. You may also have a bit of a learning curve to get precise results.
The downside of a hand planer is that it can cause tear out. Experience and care are needed to avoid it.
For beginners, the best hand plane to start with is a Jack Planer. It can do the job of both a fore planer (bulk removal) and a smoothing planer (wafer-thin shavings). A good starting point is either a no. 5 jack or a no. 62 low profile.
Recommended Jack Planes
- Stanley No. 62 Low Angle*
- Stanley No.5 Jack
Electric Hand Planer
An electric hand planer can make quick work of an uneven surface. These really shine when you need to shave off bulk from the edge of a board, but can be used on the face as well.
That being said, an electric planer can quickly ruin your day as well as your board. They have a bit of a learning curve to be able to achieve perfectly flat surfaces. Take that into consideration when making your decision.
Recommended Electric Planers
- Dewalt 5.5 amp hand planer (corded)
- Dewalt 20 v hand planer* (for those who must have cordless)
Hand-held Belt Sander
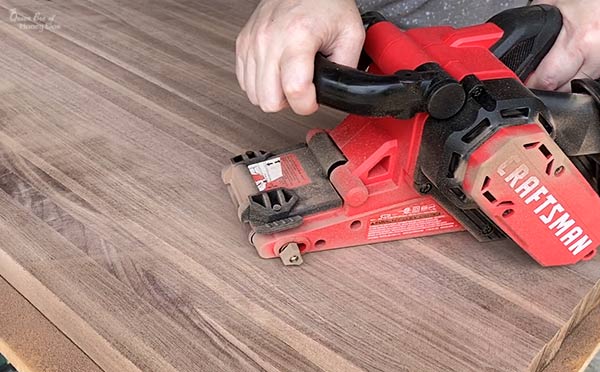
A belt sander is the fastest sander that you will be able to find for the price. They are frequently used to flatten end-grain boards but can work equally well for faces and edges.
However, you must keep these moving to avoid dips and waves. If left in place too long, a belt sander can eat right through the wood.
I frequently use mine for quick removal of material and find that the learning curve is very low with these. To see the technique I use to flatten a board, check out my DIY pastry board.
Recommended Belt Sanders
- Craftsman 3″* (Budget friendly)
- Makita 3″
Router and Sled Combination
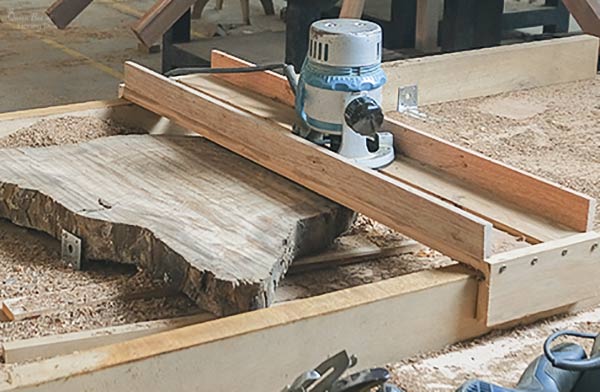
If you have a router, you might want to try building a sled to help you reduce the initial bulk. I recommend practicing before applying the bit to your board.
This method has a tendency to leave shallow waves when done incorrectly. As such, I am more inclined to recommend the belt sander route unless needing to remove a significant amount of bulk.
Regardless, you will still need to use another method to do the fine finishing work. That typically comes from one of the two below options.
Recommended Routers
More woodworking posts that you may like!
Interested in pocket hole jigs? Learn which model is ideal for each situation and find out when you should never use pocket hole jigs.
Go beyond 45 degrees on your miter saw! See how I cut any angle.
Random Orbital Sander

These last two options are really more of a final flattening/finishing technique. You will almost always need one or the other in your tool kit, but keep in mind that you shouldn’t rely on them to pull the weight of the tools listed above.
So, can you flatten with an orbital sander? Yes, and no. A random orbital will take longer than a belt sander but can achieve the same results.
Because of its limitations, I wouldn’t recommend using one for anything that requires more than 1/8” to be removed. And certainly not for flattening any large jobs.
You can probably get away with flattening a small surface. For instance, if you want to build a small cutting board, an orbital sander could handle the job. But be prepared to spend more time working on the process.
To remove the maximum thickness (recommended 1/8” max), start with a high-quality 40 grit sanding disk. Check the surface frequently with your level, and avoid using uneven pressure.
Recommended Orbital Sanders
- Makita D handle* (handle reduces hand fatigue)
- Dewalt 5″* (with cord)
Card Scrapers
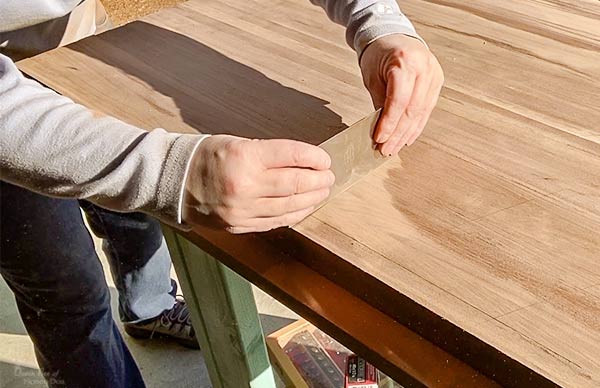
Card scrapers can be used in place of an orbital sander for smoothing wood. They perform in a similar fashion to a smoothing hand plane in that they shave off slivers of wood.
While card scrapers are not ideal for removing bulk from wood, they are amazing at shaving down those high spots on an almost flat surface.
I also love to run mine over plywood to get a perfectly smooth surface. It makes for a much smoother paint finish.
Recommended Card Scrapers
- 2 pk rectangular .032* (good beginner set)
- Burnisher* (needed to hone the scraper)
Final Comments
Which technique do you find is best? And if you have a method that is not mentioned here, don’t be shy. Drop some knowledge on the rest of us! Share your thoughts below in the comments.
Please keep it clean. Comments that do not follow the Comment's Policy may be removed.